Chocolate and Vanilla Checkerboard Cake

Image

Greetings! It has been quite awhile since my last post. This last semester was quite rough, and ain’t nobody got time for baking…or sleeping for that matter. But now, I have officially finished my undergraduate studies, and it’s time to tackle bigger and tougher projects! For this post, I tried making a chocolate and vanilla checkerboard cake. The first time I saw this kind of cake was at Lady M Confections in New York City. It was absolutely incredible. Naturally, I wanted to try making it–challenge accepted, if you will (HIMYM fans?). 


Image

Checkerboard cake from Lady M Confections

The construction of such checkerboard cake is no walk in the park. If you ask my mother (happy mothers’ day to all moms out there. May your day be filled with joy), I probably spent 20 minutes trying to dissect the cake, but of course, without any success. However, thanks to the internet, I had a plan! I was going to make 2 separate 9-inch cakes–one chocolate, and the other vanilla. I would then use some circular cutters to cut the various rings of the cake to remove and alternate the flavors of the cake and give it the checkerboard look.

Even with this “foolproof” plan in mind, the task at hand was far more difficult than previously imagined. The making of the 2 cakes was an operation that took up the entire kitchen and our dining table.

After the cakes cooled, I took them out of the pan and put them onto parchment paper to start to cut and re-construct the cakes. The issue was that I didn’t have any of the fancy cake/cookie cutters that would form a perfect circle. Instead, I ended up using a lid for a pot, a cup, and…a shot glass to measure the circles. After outlining the print, I used a knife to cut through the rest of the cake. Little did I know, I made the cakes too fluffy! I wonder if it would be better to make a thicker cake so that it isn’t as crumbly when you cut into it and so it will stay together.

DSC_0874
There was quite a lot of “reconstructive surgery” to ensure the cake didn’t completely fall apart, but the frosting definitely stitched up the cake. After putting together the first layer, I put a layer of homemade chocolate buttercream, and then proceeded on the second layer. Most checkerboard cakes have 3 layers, but I decided on 2 tiers for the first try. I was also a bit grossed out by the amount of butter used in the entire cake, but that must be why it’s so delicious, if I do say so myself.

After constructing the 2 layers of the cake, I started to frost it with the buttercream. It definitely was a fun but also super messy experience trying to frost a crumbly cake. But again, the frosting served as a nice glue.

DSC_0881
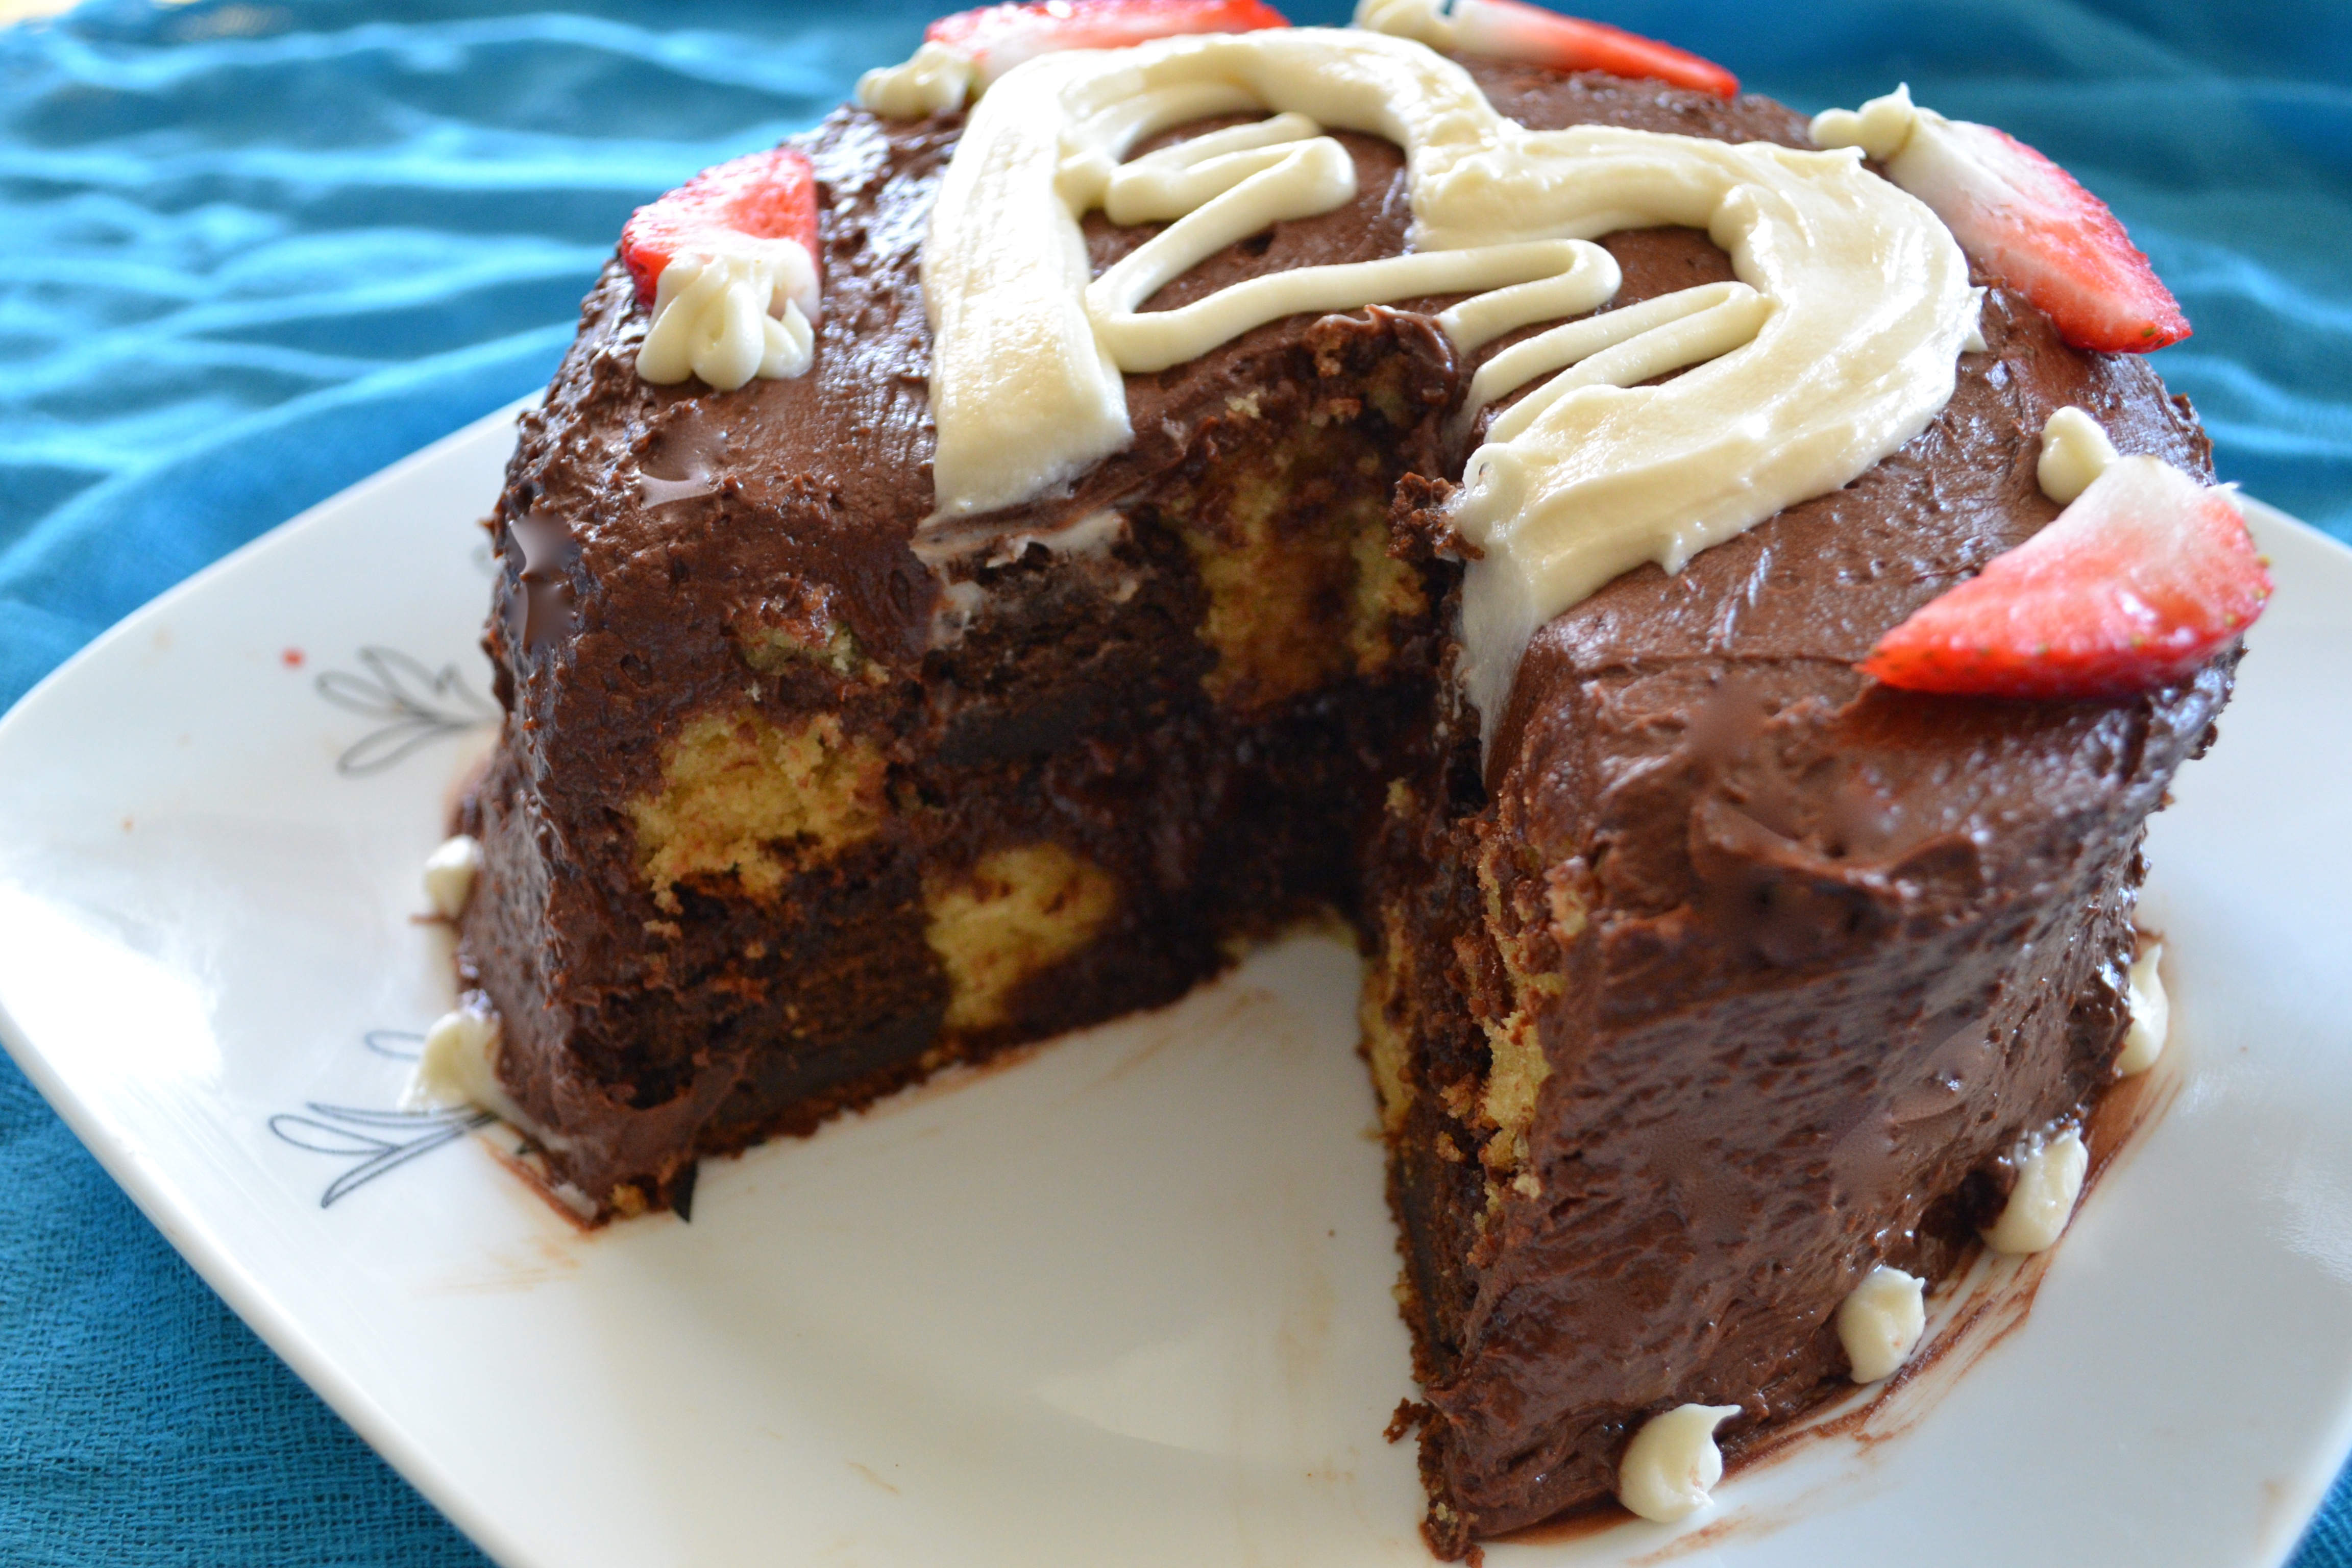
Overall, the process took nearly 3 hours. It definitely is not the prettiest cake in the world, but it still is quite tasty and a good first attempt. If you are going to make a checkerboard cake/for future attempts, here are a few tips:

– Ensure that you fully spray the cake pan with vegetable oil so that the cakes don’t stick
– The cake should be more of a brownie consistency and not super fluffy. I was having trouble picking up the rings of the cake to assemble them into a pattern. I am still questioning how Lady M has so many checkers.
– It would probably be preferable to find cake/cookie cutting rings so that your rings actually are even. Time to take a trip to Sur La Table?
– I used chocolate frosting throughout the cake, but it might be nice to glue the inner layers of the cake using white or another color frosting to give the cake the “pop” and crisp looking lines. The brown chocolate blended with the cake, so it’s not as clean.

If you have additional tips, feel free to share them!

Happy baking!
-JJC

DSC_0892

Advertisement

Hard Cider Cupcakes

DSC_0522

Would you believe it? It’s Thanksgiving weekend and almost December. I can’t believe how the year had gone by so quickly. Given the time of year, it’s prefect for the cupcake of the week: hard cider cupcakes! So what exactly do I mean, you might ask? This cupcake is an apple cider cupcake with a cinnamon whiskey buttercream. And yes, it’s as good as it sounds.

There of course is a back story behind each cupcake I make. For this one, I need to thank Janie and Denise for the idea and also sharing the Buzzfeed post about cupcakes that “will get you drunk.” After doing the math, unless you want/can eat at a minimum 30 cupcakes, there is no possible way to get drunk off these cupcakes. Nonetheless, these were really fun to make and scrumptious desserts at Thanksgiving dinner yesterday.

I based the recipe off one of the Buzzfeed recipes but ended up adding a lot more spices and ingredients to make the cake flavorful and fluffy. In the cake, I also used spiced apple cider from Trader Joe’s rather than traditional apple cider, which I imagine would be just as delicious.

While I normally am not a fan of frosting, this cinnamon whiskey buttercream was really delicious. The whiskey provided a nice kick to the sweet cinnamon vanilla. I ended up adding a dash of salt as well to “cut” the strength of the whiskey.

Overall, the cupcake was delicious and a hit at Thanksgiving, and I loved pairing it with some hot apple cider as well. Enjoy!

Xoxo,
JJC

Recipe
Cake, yield 15
1 1/2 cup flour
1 teaspoon baking powder
1/2 teaspoon baking soda
1/4 teaspoon salt
1/4 teaspoon nutmeg
1/4 teaspoon cinnamon
1/4 teaspoon cardamom
1 teaspoon vanilla
1/2 cup buttermilk
1 stick unsalted butter, room temperature
2 eggs, room temperature
3/4 cup sugar
1/2 cup apple cider
1/4 cup sour cream

1. In a small bowl, whisk together the flour, baking soda, baking powder, salt, cinnamon, nutmeg, and cardamom.
2. In a medium bowl, combine the buttermilk and vanilla extract.
3. In a large bowl, cream the butter and sugar until light and fluffy.
4. Add the eggs to the mixture one at a time.
5. Add the flour mixture and the liquids alternately, beating well after each addition.
6. Fold in the apple cider and sour cream.
7. Fill 15 cupcake liners about 2/3 full.
8. Bake at 325F for about 20 minutes or until a toothpick comes out clean.

Frosting
1 stick unsalted butter, room temperature
1 teaspoon vanilla
1 teaspoon cinnamon
1 tablespoon milk
1 tablespoon whiskey (optional)
2 cups powdered sugar

1. Whip the butter until it is light and fluffy.
2. Mix in the liquids, cinnamon, and confectioner’s sugar until it is at a desired consistency.DSC_0516

Apple Cupcake with Maple Peanut Butter Frosting

DSC_0448

This week it finally begins to feel like autumn. I think it was the first time I actually felt cold this October. But what better thing is there to do other than stay inside bake some goodies and drink hot apple cider? I contend, again, that autumn is the most delicious season of all–and it finally feels like it.

This week I wasn’t exactly sure what type of cupcakes to make and started to troll Pinterest (where else?) and found a nice recipe for apple maple cupcakes. The cake was a delicious and easy to make. After the pumpkin cupcake incident, I was wary of putting too much apple in. However, by using two medium sized Macintosh apples from Trader Joe’s, the apple provided a nice moisture to the overall cake. I liked this cake because it wasn’t too sweet, as the maple (with peanut butter) frosting was a bit on the sweeter side.

Honestly, I had a bit of trouble with the maple frosting. When you make a buttercream, you add confectioner’s sugar to thicken the frosting. But when you add maple syrup on top of the normal amount of sugar, you may end up having to schedule a visit to the dentist’s office. While I knew that, I still put too much maple syrup in the frosting, making the butter a strange sticky concoction. It looked as if the frosting would fall off, but the maple syrup acted like glue. To thicken it without putting too much sugar, I dropped in a glob of peanut butter. The peanut butter immediately thickened the mixture and added a slight savory flavor to the sweet frosting.

Ultimately, the cake and the frosting were really delicious and basically have been getting me through midterm season. If you are not currently considering moving your bed to a library, then I’m sure that these are best enjoyed along some simmering mulled wine or spiced apple cider while relaxing on comfy couches.

Enjoy!
JJC

DSC_0438

Recipe
Cake, yield 16
1 1/2 cups all-purpose flour
1 teaspoons baking powder
1/2 teaspoon baking soda
1/4 teaspoon salt
1/4 teaspoon ground cinnamon
1/4 teaspoon ground ginger
1 stick unsalted butter, room temperature
1 cup granulated sugar
1 teaspoon vanilla extract
2 large eggs, at room temperature
3/4 cup low-fat buttermilk
2 cups shredded apples (I used Macintosh apples)

1. In a small bowl, whisk together the flour, baking soda, baking powder, salt, cinnamon, and ginger.
2. In a medium bowl, combine the buttermilk and vanilla extract.
3. In a large bowl, cream the butter and sugar until light and fluffy.
4. Add the eggs to the mixture one at a time.
5. Add the flour mixture and the liquids alternately, beating well after each addition.
6. Fold in the apples.
7. Fill 16 cupcake liners about 2/3 full.
8. Bake at 350F for about 18 minutes or until a toothpick comes out clean.

DSC_0432

Frosting
1/2 cup butter, room temperature
1/2 teaspoon vanilla extract
1/4 cup maple syrup sugar
1/4 cup peanut butter

1. Whip the butter until it is light and fluffy.
2. Mix in the liquids, peanut butter, and confectioner’s sugar until it is at a desired consistency.DSC_0450

Pumpkin Chocolate Cupcakes

DSC_0416

Not only is it AT&T’s recent advertising slogan, it’s also generally human nature to think that “more is better.” However, that is not always the case when it comes to baking. Last week I thought that it would be nice to make pumpkin chocolate cupcakes to celebrate autumn, the most delicious season of all. I took a Martha Stewart and tried to half the recipe adapt it to what I normally make. Unfortunately, I didn’t realize that my recipe would only call for half the can of pumpkin puree, instead of the entire can. So, I dumped the entire can in.

The issue with adding too much pumpkin is that it is a very dense food that sinks to the bottom of the cupcake. While the cake looked ready after 17 minutes from the top and passed the toothpick rule, there was uncooked pumpkin chilling (pun intended) at the bottom of the lining. When I took the trays out, the cake almost immediately sunk and turned into a crater:

Attempt 1: don't add too much pumpkin. But when all else fails, grab a pumpkin ale.

Attempt 1: don’t add too much pumpkin. But when all else fails, grab a pumpkin ale.

In an effort to save the cupcakes, I ended up putting them back into the oven, which you’re really not supposed to do, for another 5 minutes. This resulted in a chewy pumpkin cake, but at least it was cooked. The only good thing that came out of it was the pumpkin ale (so good!), and the overall flavor of the cupcake was still good.

Feeling unsuccessful, I tried to make the same pumpkin cupcakes the following week. This time, I reduced the amount of pumpkin in the batter and kept a watchful eye on the oven to ensure that the cakes were fully cooked before taking them out of the oven. I also added a little more cinnamon and nutmeg in the cake to enhance the pumpkin flavor. Finally, I changed the frosting recipe to include a bit of coffee to give it a nice dark chocolate flavor.

Once the cakes cooled and the dark chocolate frosting was applied, it sure tasted like a biting into autumn bliss. In the end, I really enjoyed this cupcake and now am stocking up on pumpkin puree. It’s the best when enjoyed with a cup of warm spiced apple cider (preferably farm fresh, but the one from Trader Joe’s isn’t bad either). Or, if you’re stuck in midterm season, these pumpkin cupcakes will make any trip to the library just a bit better.

Xo,
JJC

Recipe
Cake, yield 18
1 1/2 cups all-purpose flour
1 teaspoon baking soda
1 teaspoon baking powder
1/4 teaspoon salt
3/4 teaspoon ground cinnamon
1/2 teaspoon ground ginger
1/4 teaspoon ground nutmeg
1/2 cup packed light-brown sugar
1/2 cup granulated sugar
1/2 cup unsalted butter, room temperature
2 large eggs, room temperature
1/2 can (8 ounces) pumpkin puree
1/4 cup sour cream

1. In a small bowl, whisk together the flour, baking soda, baking powder, salt, cinnamon, ginger, and nutmeg.
2. In a medium bowl, combine the buttermilk and vanilla extract.
3. In a large bowl, cream the butter and sugar until light and fluffy.
4. Add the eggs to the mixture one at a time.
5. Add the flour mixture and the liquids alternately, beating well after each addition.
6. Blend in the pumpkin puree and the sour cream.
7. Fill 24 cupcake liners about 2/3 full.
8. Bake at 350F for about 18 minutes or until a toothpick comes out clean.

Frosting
1/2 cup butter, room temperature
1/4 cup milk with 2 tablespoons of dissolved cornstarch
1 tablespoon coffee
1/2 teaspoon vanilla extract
~3 cups confectioners sugar
1/2 cup unsweetened cocoa powder

1. Whip the butter until it is light and fluffy.
2. Mix in the liquids, the cocoa powder and confectioner’s sugar until it is at a desired consistency.DSC_0425

German Chocolate Cupcakes

DSC_0348

For breakfast this morning, I offered my roommate a German chocolate cupcake. When she initially declined, I told her that it covers all food groups–you have your carbs, proteins, and even nuts! It’s like a Cliff bar but even tastier. Who knew cupcakes could be such a hearty breakfast food?

Until yesterday, I never made or had even tasted what German chocolate cakes/cupcakes were and was pleasantly surprised at the outcome. I decided to try making German chocolate cupcakes after a friend suggested that I make them (speaking of which, if you have any suggestions or requests, send them my way!). I thought it would be a relaxing idea to make them on a Friday night after a long week and then snap chat the process to him. But then I forgot that it was Yom Kippur…

Anyway, onto the actual cupcake. I loved the recipe that I adapted from FoodNetwork. The chocolate cake with the sour cream made the cake so moist and fluffy. Then the large amount of cocoa powder and coffee made the cake more of a dark chocolate cake, which complemented the frosting very nicely.

The frosting itself was so great. While making it, I was a bit worried that it wouldn’t hold together, since it was so liquid-y and looked a bit curdled when it was simmering on the stove. I ended up keeping the mixture on the stove for about twenty minutes. You cannot cut down this process, otherwise the mixture will not hold! I was also worried that I didn’t have the proper ingredients. Whole Foods is a great supermarket for organic, non-GMO (things-that-don’t-involve-fine-print-etc.-etc.-type-of-foods) ingredients, but sometimes you just want normal shredded sweetened coconut. I ended getting unsweetened organic coconut flakes, which, I might add, taste disgusting if you eat them plain. I chopped them up before adding them to the mixture, and I even added about one cup of confectioner’s sugar to make (a): make a healthy product unhealthy, but more importantly (b): to make the mixture sticky.

Overall, I really enjoyed this recipe. The smooth chocolate cake complemented the crunchy frosting nicely. As I did have a bit extra frosting near the end, I added a surprise in the middle of the cakes. Hint: the surprise is more frosting! I highly recommend German chocolate cupcake recipe!

Xo,
JJC

DSC_0339_2

Recipe

Cake, Yield 24

DSC_0329

Ingredients
1 3/4 cups all-purpose flour
1 cup unsweetened cocoa powder
1 1/2 teaspoons baking soda
1/2 teaspoon baking powder
1/4 teaspoon salt
1 cup buttermilk, room temperature
1/2 cup sour cream, room temperature
2 teaspoons vanilla extract
1/4 cup freshly brewed coffee
1 1/2 sticks unsalted butter, room temperature
2/3 cup granulated sugar
2/3 cup light brown sugar, lightly packed
2 eggs, room temperature

1. In a small bowl, whisk together the flour, cocoa powder, baking soda, baking powder, and salt.
2. In a medium bowl, combine the buttermilk, sour cream, vanilla extract, and coffee.
3. In a large bowl, cream the butter and sugar until light and fluffy.
4. Add the eggs to the mixture one at a time.
5. Add the flour mixture and the liquids alternately, beating well after each addition.
6. Fill 24 cupcake liners about 2/3 full.
7. Bake at 350F for about 18 minutes or until a toothpick comes out clean.

Frosting
DSC_0324

1 1/2 sticks unsalted butter
1 12-ounce can evaporated milk
1 1/4 cups light brown sugar, lightly packed
4 extra-large egg yolks
1 teaspoon pure vanilla extract
1/4 teaspoon pure almond extract
2 cups unsweetened flaked or shredded coconut
1 cup confectioner’s sugar
1 cup sliced almonds
1 cup chopped pecans
1/4 teaspoon kosher salt

1. Melt the butter in a large saucepan over medium heat
2. Whisk in the evaporated milk, brown sugar, and egg yolks
3. Simmer over medium heat for 20 minutes, stirring constantly with a whisk
–> Do not let your eggs yolks cook or let your mixture begin to look curdled
4. Take off the heat, and fold in the vanilla extract, almond extract, coconut, pecans, salt, and confectioner’s sugar.
5. Allow the mixture to cool, frost the cupcakes using a spoon or knife then enjoy!DSC_0335

Raspberry and Lemon Cupcakes

DSC_0326

It has been quite awhile since my last blog post! In the month since the minions cupcake, I have been traveling and also moved to a new apartment in Washington DC. I really like this new apartment, and my three roommates are awesome! We all love cooking and baking and somehow brought all of our kitchen appliances and supplies. The best when making cupcakes is having four sets of measuring cups, two different hand mixers, and six large mixing bowls. Excessive? Maybe, but I’m not complaining.

This recipe I tried because a friend suggested it. In the past I made lemon cupcakes with a raspberry filling, but these are the reverse of them. I loved the light fruity taste of the raspberry cake was even better than the lemon cake, and the seeds of the raspberries give a nice crunch to it. The frosting I made had a light sweet and sour lemon flavoring, which complimented the raspberry cake nicely.

Xo,
JJC

DSC_0329

Recipe

Cake, Yield 24
1 1/2 cups all-purpose flour
1 teaspoon baking powder
1 teaspoon baking soda
1/4 teaspoon salt
3/4 cup buttermilk
1 teaspoon vanilla extract
3/4 cup sugar
1/2 cup unsalted butter, room temperature (1 stick)
2 eggs
1 cup raspberry preserves (or mashed fresh raspberries)

1. In a small bowl, whisk together the flour, baking powder, and salt.
2. In a medium bowl, combine the buttermilk and vanilla extract.
3. In a large bowl, cream the butter and sugar until light and fluffy.
4. Add the eggs to the mixture one at a time.
5. Add the flour mixture and the liquids alternately, beating well after each addition.
6. Fold in the raspberry preserves, and continue to mix
7. Fill 24 cupcake liners about 2/3 full.
8. Bake at 325F for about 22 minutes or until a toothpick comes out clean.

Frosting
3/4 cup butter, room temperature
1/4 cup milk with 2 tablespoons of dissolved cornstarch
3 tablespoons lemon juice
1/2 teaspoon vanilla extract
~3 1/2 cups confectioners sugar

1. Whip the butter until it is light and fluffy.
2. Mix in the liquids and the confectioner’s sugar until it is at a desired consistency.

DSC_0323

Minion Cupcakes

DSC_1713

In making these minion cupcakes, I broke one of my cardinal rules of baking and used a boatload of artificial coloring. But come on, the minions from Despicable Me are just too adorable. I recently saw Despicable Me 2 in theaters. It wasn’t necessarily the best story (the plot of the first Despicable Me was better). However, the minions made the movie worth watching a second time. That is enough about the movies; this is a cupcake blog, not a movie review site.

The cupcakes I made this time included a chocolate cake with a vanilla buttercream frosting. I have not ventured to the world of gum paste, which makes for more cakes with a more professional-looking design. I may soon, but the summer is, believe it or not, almost over (side note: where did this summer go?). Anyway, I used a buttercream frosting and added food coloring to it. For the yellow and blue colors, I added about 7 drops of food coloring. I bought a black gel frosting pen for the black straps on the minions’ goggles and for their smiles. I also used the black to mix it with the normal white buttercream to make the grey goggles. Considering I didn’t have enough frosting bags, I think I did a pretty good job with the makeshift bags made of Ziploc bags cut at the corner. It worked pretty well, since you need to create a flat surface for the yellow. For about 16 cupcakes, I would recommend that you use 3/4 (1 1/2 sticks) of unsalted butter.

The entire process from mixing the batter to the end of frosting took nearly three hours. It was definitely worth it. The chocolate cake is nice and moist and almost melts in your mouth. Plus you have to feel happy when you see the minions. AND the cupcakes are smiling at you. Next on my list of cupcakes to bake are the evil purple minions!

evil-purple-minion

Xo,
JJC

DSC_1712

Green Tea Cupcakes

DSC_1703

Green tea cupcakes really hit home for me. Not only do I love anything green tea because it is good for the healt, green tea cupcakes were the first cupcakes that I ever made from scratch in March 2012. It’s really something to compare photos from then to now and to see how much I have improved.

This time when I made them, I had the company of my cousin Anna and used some stolen borrowed matcha powder from my sister. Baking alone, for me, is usually a stress-reducing activity (until I realize I have a dozen cupcakes for myself–then it becomes stress-inducing!), but it’s also great to bake with family or with friends.

Matcha powder, as expensive as it is, is such a beautiful powder. It is so fragrant and has a beautiful rich green color–no food coloring was used in the frosting! With the green color, it is also fun to make grass and other patterns. We made both chocolate and vanilla cupcakes with green tea frosting with a surprise inside. I’m usually partial to desserts with chocolate, but both the vanilla and chocolate cupcakes were delicious, so I’d recommend you make both!

Xo,
JJC

DSC_1683

Recipe

Vanilla Cake, yield 8
3/4 cup of all-purpose flour
1/2 teaspoons baking powder
1/4 teaspoons baking soda
1/8 teaspoon salt
1/3 cup of buttermilk
1/2 teaspoon of vanilla extract
1/4 cup of butter, room temperature
1/2 cup of sugar
1 egg

1. In a small bowl, whisk together the flour, baking powder, baking soda, and salt.
2. In a medium bowl, combine the buttermilk and vanilla extract.
3. In a large bowl, cream the butter and sugar until light and fluffy.
4. Add the eggs to the mixture one at a time.
5. Add the flour mixture and the liquids alternately, beating well after each addition.
6. Fill 16 cupcake liners about 2/3 full.
7. Bake at 325F for about 20 minutes or until a toothpick comes out clean.

P1030134

Green Tea Frosting
1/2 cup unsalted butter
2 tablespoons milk
1/2 teaspoon vanilla extract
1/2 cup matcha powder
1 3/4 cup confectioner’s sugar

1. Whip the butter until it is light and fluffy.
2. Mix in the liquids, matcha powder, and confectioner’s sugar until it is at a desired consistency.DSC_1707

Banana and Chocolate Cupcakes

DSC_1693

This summer has basically been a summer of working and baking cupcakes. I don’t mind. It’s extremely relaxing and pretty great. This weekend I made banana cupcakes with a chocolate frosting. I made these cupcakes nearly a year ago, and these look a lot prettier. The bananas I used overly ripe, making the cupcakes nice and moist and light with a delicious banana taste. The cake could have stood on its own, but the dark chocolate frosting made the overall cupcake a taste from heaven.

Xo,
JJC

Recipe
Cake, yield 16
1 1/2 cup all-purpose flour
1 teaspoon baking powder
1/2 teaspoon baking soda
1/4 teaspoon salt
3/4 cup buttermilk
1 teaspoon vanilla extract
2 ripe bananas
1/2 cup unsalted butter
1 cup sugar
2 large eggs

1. In a small bowl, whisk together the flour, baking powder, baking soda, cocoa powder, and salt.
2. In a medium bowl, combine the buttermilk and vanilla extract.
3. In a large bowl, cream the butter and sugar until light and fluffy.
4. Add the eggs to the mixture one at a time.
5. Add the flour mixture and the liquids alternately, beating well after each addition.
6. Fold in the mashed bananas into the mixture.
7. Fill 16 cupcake liners about 2/3 full.
8. Bake at 325F for about 20 minutes or until a toothpick comes out clean.

DSC_1693

Chocolate Frosting
1/2 cup unsalted butter, room temperature
3 tablespoons milk with 2 cornstarch mixed in
1/2 teaspoon vanilla
1/2 cup cocoa powder
1 1/2 cup confectioners sugar

1. Whip the butter until it is light and fluffy.
2. Mix in the liquids, cocoa powder, and confectioner’s sugar until it is at a desired consistency.

DSC_1693

Reese’s Peanut Butter Cupcakes

DSC_1670

Sometimes you just have the urge to make cupcakes (okay, maybe just me) but don’t want too many. This is one of those cupcakes that I wish I had made more than I actually did. Even though it was a simple chocolate cake, the interior was nice and moist and fluffy. As always, I had a surprise of frosting inside the cake, which give the cake a delicious balance of peanut butter and chocolate.

Xo,
JJC

Recipe
Cake, Yields 16
1 1/2 cups all-purpose flour
3/4 cup cocoa powder
1 1/4 teaspoons baking powder
1/4 teaspoon salt
1 cup buttermilk
1 teaspoon vanilla extract
1 cup sugar
1/2 cup unsalted butter, room temperature (1 stick)
2 eggs

1. In a small bowl, whisk together the flour, baking powder, salt, and chocolate powder.
2. In a medium bowl, combine the buttermilk and vanilla extract.
3. In a large bowl, cream the butter and sugar until light and fluffy.
4. Add the eggs to the mixture one at a time.
5. Add the flour mixture and the liquids alternately, beating well after each addition.
6. Fill 16 cupcake liners about 2/3 full.
7. Bake at 325F for about 20 minutes or until a toothpick comes out clean.

Frosting
1/2 cup butter, room temperature
1/4 cup milk with 2 tablespoons of dissolved cornstarch
1/4 cup peanut butter
3/4 cup unsweetened cocoa powder
~1 1/2 cups confectioners sugar

DSC_1673